Other Guides:
- Single beam (With Relay)
- Bi-Xenon (Telescoping Xenon Hi/Lo with relay)
- Hi/Lo (Xenon Lo-beam/Halogen Hi-beam)
NOTE: Never touch the bulb with your hands and keep them as clean as possible. Also, it is strongly recommended you use dielectric grease in all of the connections – it will help secure a better electrical connection. This option is available on vehicles with 9005, 9006 or H10 bulbs, or when using a plug-and-play harness that fits your bulb.
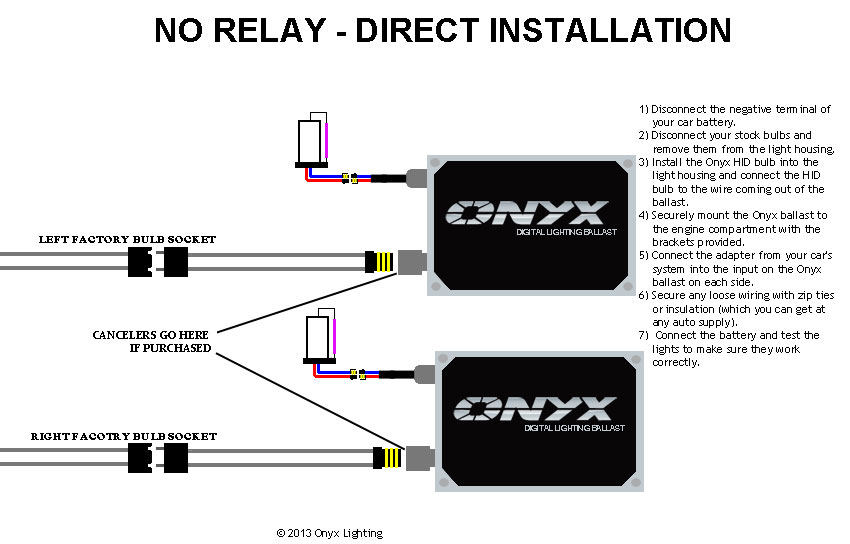
- Disconnect the negative terminal of your car battery.
- Disconnect your stock bulbs and remove them from the light housing.
- Install the HID bulb into the light housing and connect the HID bulb to the wire coming out of the ballast
- Mount the ballast to the engine compartment with the brackets provided, where is not as important as long as it is secure. You should also have the bracket mounted vertically so the ballast does not have the potential to fall out with a hard bump or excessive vibration. Some people will use zip ties to further secure the ballast horizontally, although this is not necessary in most cases.
- Connect the adapter from your car's system into the input on the ballast.
- Secure any loose wiring with zip ties or insulation (which you can get at any auto supply).
- Connect the battery and test the lights to make sure they work correctly
Guide Type:
Installation
Guide Images: